
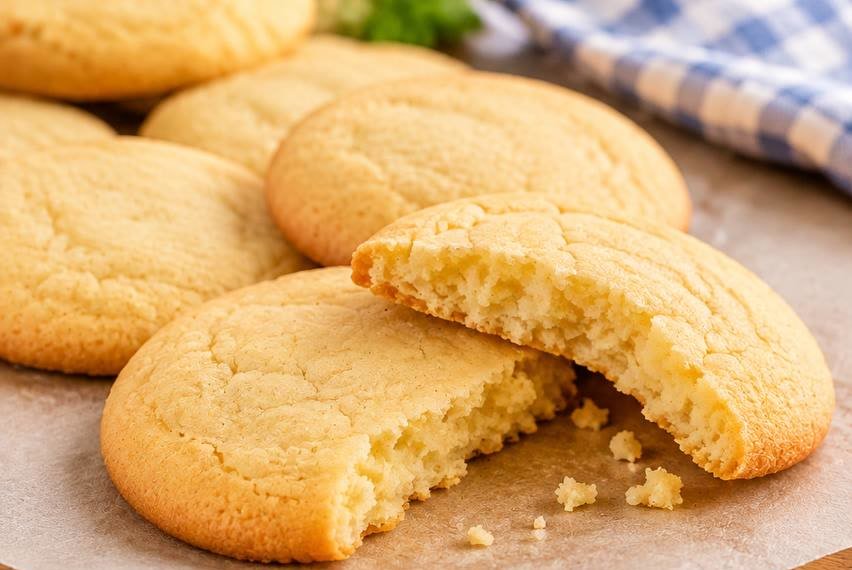
These soft sugar cookies are plain in the best way: buttery, vanilla-scented, gently golden around the edge, and tender in the middle. They are scoop-and-bake cookies, not cutout shapes or iced holiday cookies. A brief chill makes the dough easier to handle and helps the rounds keep a little height. You can leave them completely unadorned, as in the accompanying photograph, or finish a small batch with a restrained sprinkle of sugar. The method uses familiar pantry ingredients and gives you visual cues for both mixing and baking, so you can adjust to your oven rather than relying on a timer alone.
Jump to the recipe card for the measured ingredients and concise method. The details below explain the choices that most affect texture, spreading, and storage.
What makes this version different
A drop sugar cookie should be easy to bake without a rolling pin or cutters. This version starts with softened, not melted, butter. Creaming it with sugar creates a cohesive base that can hold an egg and vanilla without looking greasy. All-purpose flour supplies enough structure for a cookie you can pick up, while a measured amount of baking powder gives a little lift. The cookies are not meant to puff like cakes; they should settle into modest rounds with a delicate surface.
The dough has no icing or fillings to disguise its flavor. Butter, vanilla, and a sensible pinch of salt therefore matter. Use unsalted butter so the salt level is under your control. A pure vanilla extract gives the simplest flavor, but the recipe does not depend on any particular brand. The photo shows pale cookies with just-golden edges and a soft-looking break; this is the appearance to aim for, not a deeply browned, crisp biscuit.
Chilling is useful rather than ceremonial. A warm bowl of dough can spread quickly on a hot baking sheet. Thirty minutes in the refrigerator firms it enough to scoop neatly. If your kitchen is very warm, put the second tray of dough back in the refrigerator while the first tray bakes. The total time below includes that chill and two roughly consecutive oven batches. Actual oven time varies with pan color, scoop size, and how many trays your oven handles evenly.
Ingredients and their jobs
| Ingredient | Amount | Why it is here |
|---|---|---|
| All-purpose flour | 2½ cups (300 g) | Gives the cookies their shape; spoon and level if not weighing. |
| Baking powder | 1 teaspoon | Adds a modest lift without a cakey batter. |
| Fine salt | ½ teaspoon | Balances the sugar and vanilla. |
| Unsalted butter, softened | ¾ cup (170 g) | Adds richness and helps form a cohesive dough. |
| Granulated sugar | 1 cup (200 g) | Sweetens and helps the edges set. |
| Large egg | 1 | Binds the dough. |
| Vanilla extract | 2 teaspoons | Provides the main aromatic note. |
The flour measurement is one of the biggest variables. A cup plunged into a compacted bag can carry substantially more flour than a cup filled lightly and leveled. Weighing is the easiest way to avoid a dry dough. If you use cups, fluff the flour, spoon it into the measure, and sweep the top level. Do not pack it down. The dough should be soft and scoopable after mixing, not crumbly or pourable.
Butter should yield to a gentle press but not have a melted pool around it. If it is too cold, the mixture may stay lumpy and require excessive mixing to combine. If it is melted, the dough tends to be loose and can spread more. Cut cold butter into pieces and let it soften at room temperature only until pliable; do not leave a butter-and-egg dough unattended for a prolonged period. The egg can be brought closer to room temperature while you set out the equipment, but there is no need to heat it.
Check the package on any vanilla flavoring if you avoid alcohol-derived ingredients. Alcohol-free vanilla flavoring may be substituted according to its label; the flavor can differ. This recipe uses no pork, wine, or gelatin, but packaged ingredients and cross-contact requirements depend on the products you buy. It is not presented as a certified halal product.
Equipment and preparation
You need two baking sheets, parchment paper, a medium bowl for dry ingredients, a larger mixing bowl, a whisk, a spatula, and an electric mixer or sturdy spoon. A 1½-tablespoon cookie scoop gives fairly even portions; a tablespoon and your hands can do the same job. The yield is approximately 24 cookies when divided into 24 portions. If you make larger cookies, expect fewer pieces and a longer bake, and judge them by appearance rather than the printed time.
Line both sheets before you start. Parchment makes the baked cookies easier to lift while their centers are still delicate. A silicone mat also works, but it can change how the bottoms brown; watch the first batch. Leave roughly 2 inches between dough mounds. Cookies on a crowded sheet may join at the edges and bake less evenly.
Heat the oven to 350°F (175°C) with a rack in the middle. If baking two sheets together, use upper-middle and lower-middle positions and swap/rotate them halfway through only if your oven has noticeable hot spots. The simplest method for a first batch is one sheet at a time on the middle rack. Allow a hot sheet to cool before placing chilled raw dough on it. Otherwise the butter can soften before the tray returns to the oven.
How to make soft sugar cookies
1. Combine the dry ingredients. Whisk the flour, baking powder, and salt thoroughly. This distributes the leavening before it reaches the wet mixture. A concentrated pocket of baking powder can leave a bitter spot or an unevenly raised cookie.
2. Cream butter and sugar. Beat the softened butter and sugar in the larger bowl for about 2–3 minutes, scraping down the sides once or twice. The mixture should look lighter and smoother, not liquid. A hand mixer is convenient, but a firm spoon and more elbow grease can work. Do not continue indefinitely: the goal is an even mixture, not a rigid foam.
3. Add the egg and vanilla. Beat in the egg until it is no longer visible, then mix in the vanilla. Scrape the base of the bowl. If the mixture looks slightly curdled at this stage, it will generally come together when the flour is incorporated; avoid adding extra flour as an immediate fix.
4. Fold in the flour mixture. Add the dry ingredients in two additions on low speed or with a spatula. Stop as soon as no obvious streaks remain. Overmixing after flour has gone in can make the finished cookie tougher. The dough may feel sticky before its rest; that is expected. Cover the bowl and refrigerate for 30 minutes.
5. Portion and bake. Scoop about 1½ tablespoons of dough per cookie onto the lined sheets. If portions are uneven, round them lightly with clean hands. Do not flatten them into thin discs. Bake one tray at a time on the middle rack for an estimated 10–12 minutes, turning the sheet if your oven browns unevenly. The edges should be set and faintly golden; the center may still look soft, but not wet or raw. Oven and scoop size can shift the time.
6. Cool before moving. Let the cookies stand on the pan for 5 minutes. They continue to set as they cool. Transfer with a thin spatula to a rack and let cool completely before stacking or packing. The second tray may bake while the first batch rests. If you want a tiny sugar sparkle, add a pinch to each dough mound before baking, but the plain cookies match the supplied images.
The recipe is designed around a soft center. Do not wait for the top to become uniformly brown. The first tray is your calibration: if the cookies spread into thin discs, chill the remaining dough longer and make sure the next baking sheet is cool. If the bottoms brown well before the top sets, consider a lighter-colored sheet, moving the rack upward, or checking the oven temperature with an independent oven thermometer.
Troubleshooting the texture
The cookies spread too much. Butter that was too warm, an undermeasured flour portion, a hot sheet, or a warm dough can all contribute. Chill the remaining dough for another 15–20 minutes and use a room-temperature sheet. Do not reflexively add several tablespoons of flour to a partly baked batch; that changes the recipe and can dry the rest. For your next batch, weigh the flour and butter if possible.
The cookies are thick and dry. Flour packed into a measuring cup is a common culprit. Baking beyond a faintly golden edge also removes the soft-center effect. Check your scoop size, use the listed weight where practical, and pull the next tray when the edge is set but the center still appears slightly tender. Let the pan rest do its work. A dry finished cookie cannot be fully restored with storage, though serving it with tea or milk makes it pleasant.
The tops are pale. Pale is appropriate here. Look at the perimeter and underside, not just the color of the center. If the top still looks wet at the end of the estimated time, give it another minute and check again. Avoid opening the oven repeatedly during the first several minutes. Conversely, a cookie with a dark, hard rim has likely gone beyond the intended soft finish.
The centers seem raw. A soft center should not mean a doughy interior. Make one test cookie and break it only after it cools; the interior should be set and cohesive. If it is visibly wet, bake the remaining batch a little longer or make slightly smaller portions. The FDA advises against tasting raw flour or cookie dough, including dough containing eggs. Wash hands and utensils after handling raw ingredients.
The dough is hard to scoop after a long chill. Thirty minutes is the base rest, not an instruction to keep the bowl in the fridge indefinitely. If you prepare it the day before, let the covered dough sit briefly until scoopable, then portion onto cool lined pans. Keep it refrigerated otherwise. Do not warm it until greasy.
Variations that still fit the base recipe
For a slightly brighter finish, rub a little finely grated lemon zest into the sugar before creaming. Avoid adding much juice: extra liquid alters spreading, so zest is the more predictable way to change aroma. Orange zest works similarly. If adding a topping, keep it modest and add it before baking; a heavy load of sprinkles or wet fruit can affect the surface and the bake.
If you want cutout shapes for decorating, this is not the right dough. Scooped dough is intentionally softer and contains a different balance than a firm, rollable cutout dough. Chefly’s stained-glass sugar cookies are a separate project with a decorative aim. If you prefer spiced cookies, the site’s brown-sugar speculoos cookies offer a different flavor and texture; keep these plain rather than pretending a dash of spice makes them the same recipe.
An egg-free or gluten-free version cannot be guaranteed by replacing one ingredient in this formula without development. A commercial egg substitute or cup-for-cup flour blend may behave differently in spreading and setting. If you need to accommodate an allergy, use suitable certified products, prevent cross-contact, and treat the swap as a new batch to test rather than promising that the original baking time will hold.
Make-ahead, storage, and serving
The dough can be mixed in advance and kept covered in the refrigerator, but bake it while ingredients remain within their safe storage windows and follow the product labels. For convenience, portion the chilled dough into mounds on a tray, freeze until solid, and move them to a labeled freezer-safe bag. Bake from frozen on a lined sheet, adding time as needed and checking that the center is thoroughly baked. Freezing portioned dough helps you avoid repeatedly warming and rechilling the entire bowl.
Cool finished cookies completely before storing. Seal them in an airtight container so their centers do not lose moisture. Their quality is best in the first few days; if the kitchen is hot or humid, choose a cool, dry location and inspect them before serving. For longer keeping, wrap cooled cookies well and freeze. Thaw in their wrapping at room temperature so condensation forms on the outside rather than on the cookies. If you add a perishable frosting later, follow the frosting’s storage guidance instead of assuming plain-cookie storage applies.
The FDA’s clean, separate, cook, and chill guidance is a useful reminder when baking with eggs and flour. Wash the surfaces that contacted raw dough before placing cooled cookies on them. For more specific refrigerator and freezer guidance on eggs and other ingredients, consult the FoodSafety.gov cold-storage chart. These safety links are about ingredient handling, not a claim that cookies need to be refrigerated automatically.
Serve these on their own, with fruit and coffee, or as a simple dessert after a meal. They are not identical to Chefly’s cherry-almond icebox cookies, which have a slice-and-bake format and a nut-and-fruit flavor. Try them when you want a slice-and-bake cookie with a nut-and-fruit flavor.
Frequently asked questions
Can I skip the chill?
You can bake a test cookie right away, but the dough may spread more, especially if the butter is warm. The 30-minute chill is included in the estimated total because it improves portioning and makes the result more predictable. A cold baking sheet matters as much as cold dough. If you skip the rest, do not promise the same shape as the photograph.
Should I roll the dough in sugar?
It is optional. A light coating of granulated sugar changes the surface and adds a little crunch. The photographed cookies are simple pale rounds, so the uncoated version is the base recipe. If you coat them, do so just before baking and keep the amount small enough that it does not create a thick crust.
How do I know the cookies are done if they look soft?
Check the edge: it should be set with a whisper of gold. The middle should no longer appear shiny and wet. Leave the cookies on the hot sheet for five minutes, then transfer them carefully. A cooled test cookie tells you much more about final texture than a hot cookie that has not finished setting. If it is truly raw inside, extend the next tray’s bake.
Can I halve or double the recipe?
For a half batch, beat one egg, measure half, and use the remainder promptly in another thoroughly cooked dish; the egg is the awkward ingredient to divide. For a double batch, mix evenly without overworking the flour and keep waiting dough refrigerated while baking successive trays. The number of oven batches and total elapsed time will increase; do not simply double the printed total minutes.
Recipe development note
This recipe has not been kitchen-tested by Chefly. Baking times are estimates, so use the visual cues and check a cooled test cookie before adjusting the next tray. Numerical nutrition is omitted because ingredient brands, exact cookie size, and final yield have not been measured for a supported calculation.
PrintSoft Sugar Cookies with Lightly Golden Edges
- Total Time: 1 hour 14 minutes
- Yield: 24 cookies 1x
Description
Tender vanilla drop cookies with pale centers and lightly golden edges. The estimated method includes a brief dough chill.
Ingredients
2½ cups (300 g) all-purpose flour
1 teaspoon baking powder
½ teaspoon fine salt
¾ cup (170 g) unsalted butter, softened
1 cup (200 g) granulated sugar
1 large egg
2 teaspoons vanilla extract or checked alcohol-free vanilla flavoring
Instructions
Heat oven to 350°F (175°C). Line two baking sheets with parchment. Whisk flour, baking powder, and salt.
Cream softened butter and sugar until smooth and slightly lighter, about 2–3 minutes. Mix in the egg and vanilla.
Fold in the dry mixture just until no flour streaks remain. Cover and chill 30 minutes.
Scoop about 1½ tablespoons per cookie, spacing mounds 2 inches apart on cool lined sheets.
Bake one tray at a time on the middle rack for an estimated 10–12 minutes, until edges are set and faintly golden and centers no longer look wet. Two trays take about 24 minutes of oven time.
Rest on the baking sheet 5 minutes, then transfer to a rack. Cool completely before storing.
Notes
Times are estimates, not kitchen-tested. Chill dough for 30 minutes. Vanilla flavoring may vary by brand; check labels if avoiding alcohol.
- Prep Time: 20 minutes
- Chill Time: 30 minutes
- Cook Time: 24 minutes
- Category: Dessert
- Method: Baking